
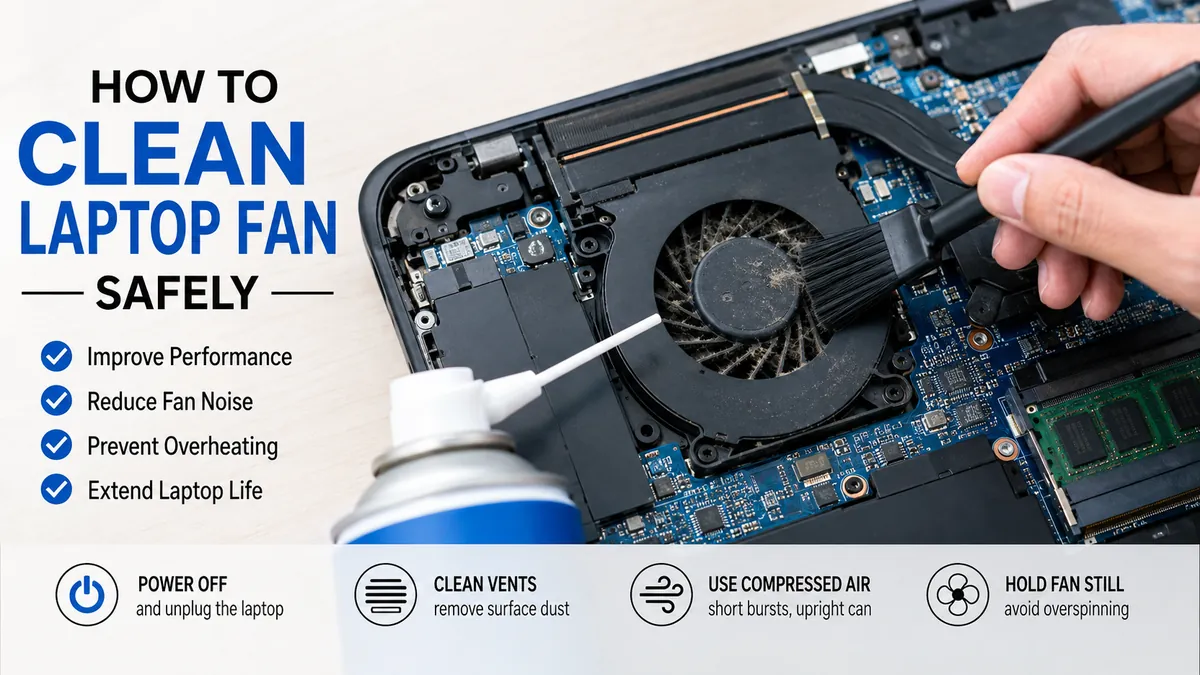

A laptop that suddenly sounds like a tiny vacuum cleaner is often trying to tell you something. Dust can collect around the fan, air vents, and heatsink fins, restricting airflow and forcing the cooling system to work harder.
Learning how to clean laptop fan properly can reduce unnecessary fan noise, restore airflow, and help prevent overheating and thermal throttling. The key is using controlled airflow and gentle cleaning rather than simply blasting compressed air into every opening.
Quick answer: Shut the laptop down completely, disconnect the charger and peripherals, and let it cool. Clear visible dust from the intake and exhaust vents, then use short bursts of compressed air while keeping the can upright. For stubborn internal dust, carefully open the bottom panel—if the manufacturer permits it—and clean the fan and heatsink directly.
Why Laptop Fans Get Dirty
A laptop cooling system constantly moves air through a relatively small space.
Cool air typically enters through intake vents on the bottom or sides. A centrifugal fan moves that air across heatsink fins connected through heat pipes to heat-producing components such as the CPU and GPU. Warm air then exits through an exhaust vent.
Unfortunately, air brings dust with it.
Over time, debris can collect on:
- Intake grilles
- Exhaust vents
- Fan blades
- Fan housing
- Heatsink fins
- Internal surfaces around the cooling assembly
A small amount of surface dust usually causes little trouble. A dense layer around the heatsink is different because it can restrict the amount of air passing through the cooling system.
When heat cannot escape efficiently, the laptop may increase fan speed. If temperatures continue rising, the processor or graphics hardware can reduce performance through thermal throttling.
That is why a dirty laptop can sometimes feel slower even though nothing is wrong with its storage or operating system.
Signs You Need to Clean Your Laptop Fan
Not every noisy fan is dirty. Fans naturally become louder during gaming, video editing, software updates, rendering, and other CPU- or GPU-intensive tasks.
Dust becomes a stronger possibility when the behavior changes from what is normal for your machine.
Common warning signs include:
- Fan running loudly during light workloads
- Fan staying active for long periods
- Laptop becoming hotter than it previously did
- Weak airflow from the exhaust
- Visible dust around the ventilation openings
- Performance dropping after the laptop heats up
- Fan repeatedly speeding up and slowing down
- Unexplained overheating or thermal shutdowns
Before opening anything, check software activity too. On Windows, Task Manager can reveal applications consuming unusually high CPU resources. High processor utilization creates more heat and can make a perfectly clean fan run at high speed.
Dirty fan or software problem?
A useful distinction is whether the fan becomes quiet after the workload stops.
If CPU usage returns to normal but the laptop remains unusually hot and noisy, blocked airflow becomes more likely.
If the fan becomes quiet once a demanding program closes, cleaning may not be necessary.
What You Need to Clean a Laptop Fan Safely
You do not need many tools for basic maintenance.
For external cleaning
Prepare:
- Canned compressed air intended for electronics
- Clean microfiber cloth
- Soft, clean brush
- Well-lit workspace
For internal cleaning
You may also need:
- Precision Phillips screwdriver
- Plastic opening tool or spudger
- Small container or magnetic parts tray for screws
- Anti-static wrist strap
- Cotton swabs
- Laptop service manual
The exact screwdriver and opening procedure depend on the laptop.
Modern laptops from manufacturers such as Dell, HP, Lenovo, ASUS, Acer, and Apple can differ considerably in their internal layouts. Always check instructions for the exact model before removing the bottom cover.
Quick Takeaway: Start with external vent cleaning. Opening the laptop should be the second option, not the first.
how to clean laptop fan Without Opening the Laptop
For routine dust buildup, cleaning through the ventilation openings is the safest starting point.
1. Shut Down the Laptop Completely
Do not leave the laptop in sleep mode.
Perform a full shutdown and disconnect:
- AC adapter
- USB devices
- External displays
- Ethernet cable
- Memory cards
- Other peripherals
If your laptop has an easily removable battery, remove it according to the manufacturer’s instructions.
Let the computer cool before cleaning.
This matters because you are about to work around the cooling system and electrical components. Dell and HP both recommend powering down and unplugging the device before cleaning its fan or vents.
2. Find the Intake and Exhaust Vents
Turn the laptop over and inspect its sides, rear, and bottom.
Intake vents allow cooler air to enter and are frequently located underneath the laptop.
Exhaust vents release heated air and are often positioned at the back or sides, although placement varies by model.
Some thin laptops use less obvious ventilation paths, so check the owner’s or service manual if you cannot identify them confidently.
3. Remove Surface Dust First
Before using compressed air, remove loose dust from around the grille.
Use a clean microfiber cloth on exterior surfaces and a soft brush around the openings.
Brush away from the vent rather than forcing debris inside.
Do not push a brush deeply through the grille because internal fan blades, wires, or other components may sit close behind it.
4. Use Compressed Air in Short Bursts
Keep the compressed-air can upright.
Aim toward the ventilation opening and use several short, controlled bursts rather than holding the trigger continuously.
Move between openings instead of concentrating high-pressure air on one area.
Short bursts help dislodge dust while reducing the chance of spraying liquid propellant from an improperly held can. Current manufacturer guidance likewise recommends controlled bursts rather than continuous spraying.
5. Avoid Overspinning the Fan
One detail is frequently overlooked when people learn how to clean laptop fan systems: compressed air can make a fan rotate far faster than it normally would.
That is unnecessary.
If the fan is directly accessible, gently immobilize it while cleaning. Do not jam hard objects into hidden components through a vent just to reach the fan.
When you cannot safely hold the blades, use conservative bursts rather than trying to make the fan spin rapidly.
The objective is to remove dust—not see how fast the fan can rotate.
6. Clean Both Airflow Paths
Do not focus only on the vent that looks dusty.
Dust can accumulate at both the intake and the heatsink near the exhaust. Carefully cleaning accessible ventilation paths provides a better chance of restoring normal airflow.
Finish by wiping away any debris that lands on the exterior.
7. Inspect Before Powering On
Look through the vents with good lighting.
Make sure there is no obvious loose material sitting in the openings. Then reconnect the charger and start the laptop.
Listen to the fan and feel the airflow from the exhaust.
A successful light cleaning may result in:
- Stronger exhaust airflow
- Less frequent fan activity
- Lower fan noise
- Reduced surface heat
Do not expect complete silence. A laptop fan should still speed up whenever the CPU or GPU generates enough heat.
how to clean laptop fan by Opening the Bottom Panel
Compressed air through the vents works well for loose dust, but it has limits.
Older laptops or machines used in dusty environments can develop compacted debris around the fan and heatsink fins. In these cases, accessing the cooling assembly directly provides a more thorough clean.
1. Check Your Laptop’s Service Instructions
Before removing a screw, identify your exact laptop model.
Look for the manufacturer’s maintenance or service manual and determine:
- How the bottom cover is removed
- Whether hidden screws are present
- Where the battery connector is located
- Where the fan is positioned
- Whether fan removal is necessary
- Whether opening the machine affects warranty or service coverage
HP specifically advises consulting the laptop’s manual before attempting internal access.
If the machine is under warranty or has a difficult sealed construction, professional servicing may be the safer choice.
2. Prepare a Static-Safe Workspace
Work on a clean, dry, well-lit desk rather than carpet or bedding.
Power the machine off and disconnect everything.
If the battery is internal and the service procedure instructs you to disconnect it, carefully disconnect the battery before working around internal components.
Ground yourself before touching electronics. An anti-static wrist strap is useful when working inside the chassis.
Keep track of every screw.
Laptop screws can have different lengths, and reinstalling a long screw in the wrong location can potentially damage the chassis or internal components.
A simple trick is to photograph the laptop before and during disassembly.
3. Remove the Bottom Cover Carefully
Remove the screws according to the service manual.
Many modern bottom panels are also secured by plastic clips. Use a suitable plastic opening tool rather than aggressively pulling on the cover.
If the panel refuses to move, stop.
A hidden screw may still be installed. Forcing the panel can crack clips or damage the case.
4. Locate the Fan, Heat Pipes, and Heatsink
Once the panel is removed, identify the cooling assembly.
You will usually see a circular or snail-shaped blower fan near one or more copper-colored heat pipes. These lead toward a finned heatsink, typically positioned close to the exhaust opening.
The heatsink deserves just as much attention as the fan.
A fan can look reasonably clean while the thin fins beside it are packed with a felt-like wall of dust.
5. Hold the Fan Still
Before applying compressed air directly to the cooling assembly, prevent the fan from spinning freely.
Gently hold the blades in place without bending them.
Never press heavily on the fan hub or blades.
6. Blow Dust From the Heatsink Fins
Use short bursts of compressed air to clear the heatsink.
Work from different accessible angles so loosened debris can escape instead of being driven farther into the cooling assembly.
You may see a surprisingly dense strip of dust come away from the fins.
That blockage is often more significant for cooling performance than a light coating on the fan blades.
7. Clean the Fan Blades
If dust remains attached to the blades, use a soft brush or dry cotton swab.
Support the fan carefully and work gently.
Avoid bending blades because even minor physical damage can affect balance and produce vibration or unusual noise.
Also be careful around the small fan cable connecting the assembly to the motherboard.
8. Reassemble the Laptop
Check that:
- No tools remain inside
- No cables were accidentally disconnected
- Fan connector is secure
- Battery connector is restored if you disconnected it
- Ventilation paths are clear
Replace the bottom cover and return every screw to its original position.
Do not overtighten screws.
Start the laptop and listen for unusual sounds.
Quick Takeaway: Deep cleaning means cleaning the complete airflow path—fan blades, fan housing, exhaust area, and heatsink fins—not simply making the visible fan look clean.
How to Clean a Laptop Fan Without Compressed Air
What if you do not have canned air?
You can still perform limited cleaning, but the safest approach depends on whether you are opening the laptop.
For exterior maintenance, use a clean microfiber cloth and soft brush to remove dust around the vent openings.
If you can safely access the fan internally, a soft anti-static or electronics-safe brush can loosen dust from the fan and heatsink. Work slowly and brush debris outward.
This method is less effective at clearing dust trapped deep between heatsink fins, so compressed air remains useful for a thorough clean.
Can you use a vacuum cleaner?
A normal household vacuum is a poor choice around laptop electronics.
It can create strong uncontrolled airflow and static-related risks while providing little precision around delicate internal parts. Avoid placing a household vacuum nozzle directly against the fan, motherboard, or vents.
Can you use a hair dryer?
No.
A hair dryer can introduce heat and uncontrolled airflow. Even its cool setting is not a good substitute for electronics-grade compressed air.
Can you blow into the vents with your mouth?
Avoid it.
Human breath contains moisture, and it provides neither the pressure nor control needed for effective cleaning.
Mistakes to Avoid When Cleaning a Laptop Fan
The cleaning process is simple, but careless technique can create a bigger problem than the original dust buildup.
| Mistake | Why to avoid it | Better approach |
|---|---|---|
| Cleaning while powered on | Components remain energized | Fully shut down and unplug |
| Using long air blasts | Less control and greater chance of overspinning | Use short bursts |
| Tilting canned air excessively | May release propellant | Keep the can upright |
| Making the fan spin rapidly | Can stress the fan mechanism | Hold accessible blades still |
| Using a household vacuum | Poor control and potential static concerns | Use electronics-safe compressed air |
| Using a hair dryer | Introduces unnecessary heat | Use controlled cool compressed air |
| Spraying liquid into vents | Moisture can reach electronics | Keep vent cleaning dry |
| Forcing the bottom cover | Can break clips or cables | Follow the service manual |
| Ignoring the heatsink | Dust may remain in the main airflow restriction | Clean fan and heatsink fins |
| Mixing up screws | Different screw lengths can cause damage | Map or organize screws |
Another common mistake is assuming that every overheating problem is caused by dust.
Cleaning solves airflow restrictions. It cannot repair a defective fan, failing sensor, dried thermal interface material, damaged heat pipe, incorrect firmware behavior, or excessive software load.
Does Cleaning a Laptop Fan Improve Performance?
It can—but only when heat was restricting performance in the first place.
Modern processors protect themselves from excessive temperatures. When cooling cannot remove heat quickly enough, the system may reduce CPU or GPU frequency. This behavior is commonly called thermal throttling.
Cleaning a clogged cooling system improves airflow, allowing the heatsink to dissipate heat more effectively.
Potential improvements include:
- Lower operating temperatures
- Less fan noise
- More consistent CPU performance
- More consistent GPU performance
- Fewer overheating-related shutdowns
- Better sustained performance under heavy workloads
However, cleaning does not make a normally functioning processor inherently faster.
If your laptop was already operating within its designed temperature and power limits, you may notice little performance difference.
How Often Should You Clean a Laptop Fan?
There is no universal schedule because dust accumulation depends heavily on the environment.
Rather than cleaning internally according to a rigid calendar, inspect the vents periodically and respond to changes in temperature, noise, and airflow.
More frequent inspection makes sense when the laptop is regularly used around:
- Carpet
- Bedding
- Pet hair
- Cigarette smoke
- Workshops
- Construction dust
- Dusty rooms
A laptop used on a clean hard desk may require far less attention.
Do gaming laptops need cleaning more often?
Potentially.
Gaming laptops often move substantial amounts of air because powerful CPUs and discrete GPUs generate considerable heat under load. Greater airflow can mean more dust passing through the cooling system.
That does not mean you should constantly dismantle a gaming laptop.
Regularly inspect the vents and clean when airflow, noise, or temperatures indicate a genuine need.
How to Keep Dust Out After Cleaning
You cannot completely prevent dust from entering an actively cooled laptop, but you can slow the buildup.
Use the laptop on a hard surface
Soft surfaces such as beds, blankets, sofas, and thick carpet can partially block bottom intake vents.
A desk or other firm surface gives the cooling system more room to breathe.
Keep intake vents unobstructed
Laptop stands can improve clearance around bottom-mounted vents, but the main objective is simply to avoid blocking them.
Clean the surrounding workspace
Dust on the desk eventually becomes dust in the cooling system.
Regular surface cleaning helps reduce the amount of debris available for the laptop to pull inside.
Pay attention to pet hair
Fine pet hair can accumulate around grilles and heatsink fins surprisingly quickly.
Inspect vents more frequently if pets spend time around your workspace.
Avoid smoking near the laptop
Smoke residue can make internal contamination sticky, allowing ordinary dust to adhere more strongly to fan blades and heatsink surfaces.
What If the Fan Is Still Loud After Cleaning?
A clean fan does not guarantee a quiet laptop.
If the fan remains loud, check what the computer is doing before taking it apart again.
Check CPU and GPU usage
On Windows, open Task Manager with Ctrl + Shift + Esc and look for applications consuming substantial processor resources.
Browsers with many tabs, games, antivirus scans, background updates, video encoding, and poorly behaving applications can all keep the processor busy.
HP recommends checking software workload as part of diagnosing persistent fan noise, along with keeping system software, drivers, and BIOS current.
Install appropriate system updates
Fan behavior can sometimes be influenced by firmware and thermal-management settings.
Use updates provided specifically for your laptop model, particularly:
- BIOS or UEFI updates
- Chipset drivers
- Graphics drivers
- Manufacturer thermal-management utilities
Dell also recommends checking BIOS and fan-related hardware when fan problems continue after cleaning.
Consider the thermal interface
The cooling assembly uses thermal interface material between heat-generating components and the heatsink.
On an older machine, degraded thermal paste can sometimes contribute to poor heat transfer. Replacing it is considerably more involved than routine fan cleaning and usually requires removing the heatsink.
Do not remove the heatsink simply because you saw thermal-paste replacement in a cleaning tutorial.
If temperatures remain abnormal despite clear vents and a clean fan, thermal-system servicing can be investigated separately.
Listen for mechanical fan problems
Dust usually causes airflow restriction. A failing fan can produce different symptoms.
Possible signs include:
- Grinding
- Clicking
- Scraping
- Rattling
- Fan failing to start
- Fan repeatedly stopping
- Visible wobbling
Cleaning will not repair worn fan bearings or damaged blades.
The fan may need replacement.
When Should You Get Professional Help?
DIY cleaning makes sense when you can safely reach the necessary components and have reliable model-specific instructions.
Professional servicing is a better option when:
- The laptop is difficult to disassemble
- Opening it may affect warranty coverage
- The battery is swollen
- The fan makes grinding or scraping noises
- The fan does not spin
- The laptop shuts down from heat after cleaning
- You are uncomfortable disconnecting an internal battery
- The heatsink must be removed
- Liquid contamination is present
- Internal cables or connectors appear damaged
A swollen battery deserves particular caution. Do not press, puncture, or work unnecessarily around a visibly swollen lithium-ion battery.
Final Thoughts on how to clean laptop fan
The safest way to approach how to clean laptop fan maintenance is to start with the least invasive method.
Shut the computer down, disconnect power, clear the intake and exhaust openings, and use short bursts of compressed air. That is often enough for routine dust.
When airflow remains weak or overheating continues, a careful internal cleaning can remove compacted debris from the fan and heatsink fins. Follow the service instructions for your exact model, control the fan while using compressed air, and never force a panel or connector.
Most importantly, treat cleaning as one part of cooling-system diagnosis. If a clean laptop still runs unusually hot or produces grinding fan noise, investigate software load, firmware, fan condition, and the rest of the thermal system rather than repeatedly cleaning it.
