
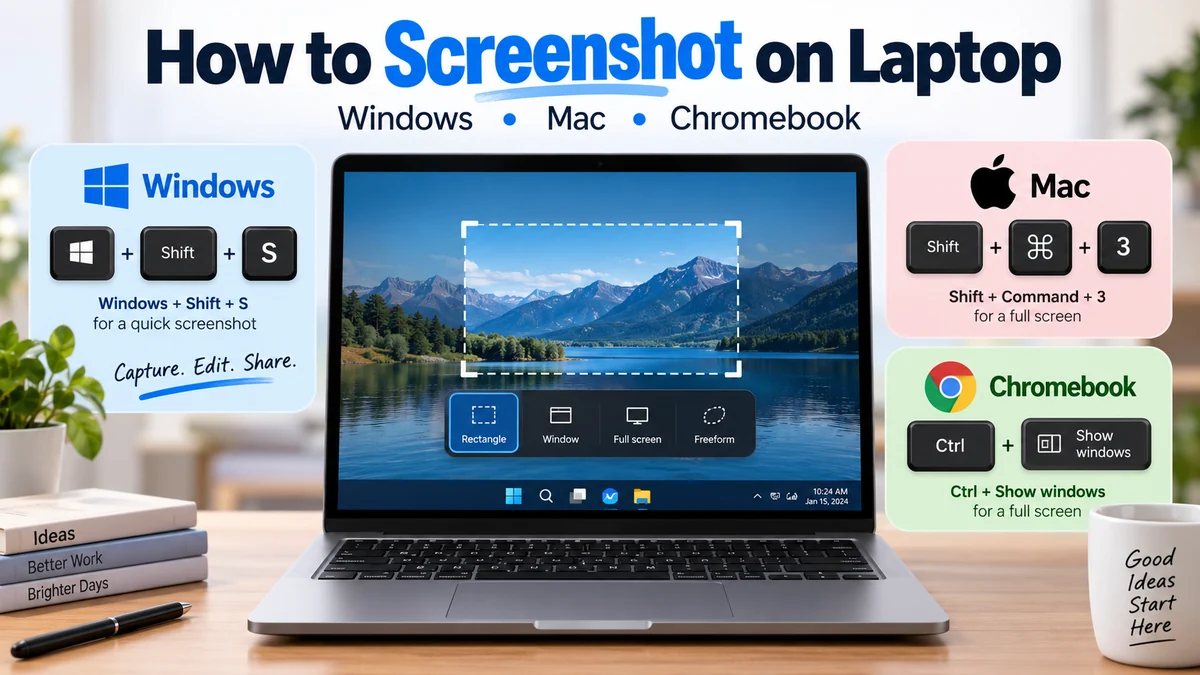

Taking a screenshot sounds simple until you press a key and nothing seems to happen. The reason is that laptops use different screenshot shortcuts depending on the operating system, keyboard layout, and sometimes the manufacturer.
If you want to know how to screenshot on laptop, start by identifying whether you use Windows, macOS, or ChromeOS. On Windows, press Windows + Shift + S for the Snipping Tool. On a MacBook, use Shift + Command + 3. On a Chromebook, use the Screenshot key or Shift + Ctrl + Show windows.
Here is the quickest reference:
| Laptop | Full Screenshot | Screenshot Part of Screen | Main Tool |
|---|---|---|---|
| Windows 10/11 | PrtSc or Windows + PrtSc | Windows + Shift + S | Snipping Tool |
| MacBook | Shift + Command + 3 | Shift + Command + 4 | Screenshot |
| Chromebook | Ctrl + Show windows | Shift + Ctrl + Show windows | Screen Capture |
The best method depends on what you actually want to capture. A full-screen image is useful for documenting your entire desktop, while a rectangular snip is usually better for sharing an error message, receipt, conversation, or specific part of a webpage.
How to Screenshot on Laptop With Windows 11 or Windows 10
Most laptops from Dell, HP, Lenovo, ASUS, Acer, MSI, Samsung, and similar manufacturers run Windows. Although their keyboards can look different, the underlying Windows screenshot tools are largely the same.
For everyday use, Windows + Shift + S is usually the most flexible shortcut.
Use Windows + Shift + S for a Quick Screenshot
Press:
Windows key + Shift + S
The screen dims and the Snipping Tool capture interface appears. You can then select the type of screenshot you need.
Microsoft’s current Snipping Tool provides four image-capture modes: rectangular, window, full-screen, and freeform.
The basic process is:
- Open the content you want to capture.
- Press Windows + Shift + S.
- Choose the appropriate snipping mode.
- Drag over the area if you’re taking a rectangular or freeform capture.
- Release the mouse or touchpad.
- Open the screenshot notification if you want to edit it.
- Crop, annotate, copy, or save the image.
The captured image is also available through the clipboard, making this particularly convenient when you simply want to paste a screenshot into an email, document, messaging app, or image editor.
Understanding the Four Snipping Tool Modes
The mode you choose determines how much of the display is captured.
Rectangle lets you draw a box around a specific area. This is the mode most people need for everyday screenshots.
Window captures an individual application window rather than everything visible on your desktop.
Full screen captures the entire visible display.
Freeform lets you manually draw an irregular shape around the content you want.
Microsoft also supports video capture through the current Snipping Tool, although that creates a screen recording rather than a still screenshot.
Quick Takeaway: For most Windows users, remember one shortcut: Windows + Shift + S. It gives you far more control than simply pressing Print Screen.
How to Screenshot on Laptop Using the Print Screen Key
The traditional Windows method uses the Print Screen key.
Depending on your keyboard, it may be labeled:
PrtSc, PrtScn, PrntScrn, or Print Screen.
The key is commonly located toward the upper-right portion of a keyboard, although its exact location and label vary between laptop models.
Press PrtSc to Copy the Entire Screen
Press:
PrtSc
On a standard Windows configuration, Print Screen captures the entire screen to the clipboard. You can then open an application such as Microsoft Paint or Word and press:
Ctrl + V
The screenshot appears inside the application, where you can edit or save it.
This clipboard behavior explains a common problem: people press Print Screen and assume it did not work because they cannot immediately find an image file.
The screenshot may simply be waiting on the clipboard.
Use Windows + PrtSc to Save a Screenshot Automatically
If you want to create a file rather than manually paste the capture, try:
Windows key + PrtSc
Microsoft documents this shortcut for supported Windows hardware. Screenshots taken this way can be found through File Explorer under Pictures > Screenshots.
This method is particularly useful when you need to take several full-screen screenshots quickly.
Capture Only the Active Window
Sometimes you have several programs open but only want one window in your screenshot.
First click the window you want to capture, then press:
Alt + PrtSc
Windows copies an image of the active window to the clipboard. You can then use Ctrl + V to paste it into another application.
This avoids exposing your desktop, taskbar content, or unrelated applications.
How to Screenshot on Laptop Without a Print Screen Button
Compact laptops sometimes do not have a clearly labeled PrtSc key. That does not mean the computer cannot take screenshots.
The simplest solution on Windows 10 or Windows 11 is:
Windows + Shift + S
Because this launches the Snipping Tool directly, you do not need a dedicated Print Screen button.
Microsoft also documents Fn + Windows key + Spacebar as an alternative screenshot combination for some devices without a PrtSc button.
Your laptop manufacturer may assign screenshot functionality to a secondary key as well.
Why Some Laptops Require the Fn Key
Laptop keyboards have limited physical space, so manufacturers often assign multiple functions to the same key.
You may therefore need:
Fn + PrtSc
instead of PrtSc alone.
Look closely at the function-key row and other keys around the upper-right side of the keyboard. Print Screen might appear as smaller secondary text.
The exact combination can vary by laptop design, so if the normal Windows shortcuts work but PrtSc does not, the keyboard layout is likely the issue rather than Windows itself. Lenovo, for example, notes that laptop implementations can require the Fn key with the relevant Print Screen function.
How to Screenshot on HP, Dell, Lenovo, Acer, and ASUS Laptops
A frequent misconception is that each laptop brand requires a completely different screenshot procedure.
Usually, the operating system matters more than the logo on the laptop.
A Windows-based HP, Dell, Lenovo, ASUS, or Acer laptop can generally use:
| What You Want | Shortcut |
|---|---|
| Select part of screen | Windows + Shift + S |
| Entire screen to clipboard | PrtSc |
| Entire screen to file | Windows + PrtSc |
| Active window | Alt + PrtSc |
| Open screenshot interface | Windows + Shift + S |
The main manufacturer-specific difference is the keyboard.
For example, your Print Screen function might share a key with another command, meaning Fn + PrtSc is required. Another model may provide a dedicated screenshot or snipping key.
If you’re unsure, Windows + Shift + S is the most reliable place to start on a modern Windows laptop.
Where Are Screenshots Saved on a Windows Laptop?
The answer depends on how the screenshot was taken.
A screenshot captured through Print Screen may initially exist only in your clipboard, whereas Windows + PrtSc can create an image file in the Screenshots folder.
For automatically saved Windows screenshots, check:
File Explorer > Pictures > Screenshots
The current Snipping Tool also supports automatic screenshot saving, and Microsoft says its settings can be used to change automatic saving behavior or the default Screenshots folder.
If you still cannot find a capture, try pasting with Ctrl + V into Paint. If the image appears, it was copied to the clipboard rather than saved as a standalone file.
Clipboard vs. Saved Screenshot
This distinction causes more confusion than almost anything else.
Copied to clipboard means the screenshot is temporarily available for pasting.
Saved to folder means an actual image file has been created on the laptop.
If you capture something important to the clipboard, save it rather than assuming it will remain there indefinitely.
How to Screenshot on Laptop With a MacBook
Apple laptops use a different set of keyboard shortcuts because macOS does not rely on the Windows Print Screen system.
For a full-screen screenshot, press:
Shift + Command + 3
Apple documents this combination as the shortcut for capturing the entire Mac screen.
Screenshot the Entire MacBook Screen
Press:
Shift + Command + 3
The screen is captured immediately.
A thumbnail can appear in the corner after a capture, allowing you to open the image for editing or sharing. Apple’s Screenshot workflow also provides Markup tools for annotations.
Screenshot Part of the Screen on a MacBook
Press:
Shift + Command + 4
Your pointer changes to a crosshair.
Click and drag around the section you want to capture, then release to take the screenshot.
This is useful when you only need a paragraph, image, chart, error message, or small interface element.
Capture a Specific Window on Mac
Press:
Shift + Command + 4
Then press the Spacebar.
The pointer changes to a camera icon. Click the window or menu you want to capture.
This produces a cleaner result than manually drawing around a window.
Open the Mac Screenshot Utility
For more controls, press:
Shift + Command + 5
Apple’s Screenshot utility lets you capture the entire screen, a selected window, or a selected area. It also includes screen-recording controls and options for adjusting the save location and timer.
For someone who frequently takes screenshots, Command + Shift + 5 is worth remembering because it puts the major capture controls in one interface.
Where Do Screenshots Go on a MacBook?
By default, Mac screenshots are typically saved to the Desktop. Apple’s screenshot interface also allows the save location to be changed through its Options menu.
If you cannot find a screenshot, check the Desktop first.
You can also open Finder and look under recent files.
How to Screenshot on Laptop With a Chromebook
Chromebooks use ChromeOS, so Windows and Mac shortcuts do not apply.
Google’s current Chromebook instructions recommend pressing the dedicated Screenshot key when the keyboard has one. If it does not, press:
Shift + Ctrl + Show windows
This opens Screen Capture, where you can choose a full-screen, partial, or window screenshot.
The Show windows key usually has an icon resembling a window or rectangle with additional lines or shapes beside it.
Capture the Full Chromebook Screen
On keyboards using the traditional Chromebook layout, you can use:
Ctrl + Show windows
For more control, open the Screen Capture interface with:
Shift + Ctrl + Show windows
and choose the full-screen option.
Screenshot Part of a Chromebook Screen
Press:
Shift + Ctrl + Show windows
Then choose partial screenshot, select the required area, and capture it.
Google also allows users to capture an individual window through the same Screen Capture interface.
What If You Use an External Keyboard?
An external PC keyboard may not have the Chromebook Show windows key.
Google recommends:
Ctrl + Shift + F5
when the external keyboard lacks Show windows.
Where Do Chromebook Screenshots Go?
Chromebook screenshots are saved to the Downloads folder by default. Google also allows you to choose a different folder through Screen Capture settings.
Screenshots are also automatically copied to the clipboard, making them easy to paste into another application.
How to Take a Screenshot of Only Part of Your Laptop Screen
Capturing only the relevant content usually produces a better screenshot than sharing your entire desktop.
Use the shortcut for your operating system:
| Operating System | Partial Screenshot Shortcut |
|---|---|
| Windows | Windows + Shift + S |
| macOS | Shift + Command + 4 |
| ChromeOS | Shift + Ctrl + Show windows |
On Windows, select Rectangle and drag around the required area.
On macOS, drag the crosshair around the content.
On Chromebook, choose the partial screenshot mode from Screen Capture.
This approach also helps protect privacy. If you’re sharing an error message with technical support, for example, there is rarely a reason to include unrelated browser tabs, personal notifications, files, or other applications.
How to Edit or Annotate a Screenshot
Taking the image is often only the first step.
You may need to crop unnecessary content, highlight a button, draw an arrow, cover sensitive information, or extract text.
Editing Screenshots in Windows
Open the captured image in Snipping Tool.
Current versions provide tools for cropping, drawing, highlighting, adding shapes, and working with captured text. Microsoft’s Text actions feature uses optical character recognition, or OCR, to extract text from an image and can provide quick-redaction options for items such as email addresses and phone numbers.
That can be useful when documenting software problems or sharing screenshots that contain personal information.
Editing Screenshots on Mac
Click the screenshot thumbnail shortly after taking the capture.
Apple’s Markup tools can then be used for annotations before you save or share the image.
Editing Chromebook Screenshots
After taking a Chromebook screenshot, use the resulting preview and built-in image tools to review the capture. Because the screenshot is also copied to the clipboard, you can paste it directly where needed without first locating the file.
How to Take a Delayed Screenshot on a Laptop
Some things disappear the moment you click elsewhere. Dropdown menus and temporary interface elements are common examples.
A delayed screenshot solves that problem.
Windows Snipping Tool includes a Delay feature. You can configure a short delay, start the capture, and then open the menu or interface you need before the screenshot is taken.
On a Mac, open the Screenshot utility with:
Shift + Command + 5
Then use Options to access timer settings.
This is much easier than repeatedly trying to press several keys while keeping a temporary menu open.
How to Take a Scrolling Screenshot on a Laptop
A normal screenshot only captures content currently visible on the display. That becomes a problem when you want an entire long webpage, conversation, document, or dashboard.
This is where a scrolling screenshot or full-page capture differs from a normal full-screen screenshot.
A full-screen screenshot captures the entire visible display. A full-page screenshot attempts to capture content extending below the visible browser viewport.
Browser-specific tools and screenshot extensions can provide this functionality. For example, browser capture utilities may stitch or render the page into one long image.
Before installing an extension, check whether your browser or application already offers full-page capture functionality. Installing unnecessary extensions increases the number of third-party tools that can potentially access browser content.
Why Is Print Screen Not Working on My Laptop?
If you press Print Screen and nothing obvious happens, don’t assume the key is broken.
Work through these checks.
1. Try Pasting the Screenshot
Open Paint, Word, an email, or another application and press:
Ctrl + V
If the screenshot appears, Print Screen worked. It simply copied the image to the clipboard rather than displaying or saving it automatically.
2. Try the Fn Key
Use:
Fn + PrtSc
Some compact laptop keyboards assign Print Screen as a secondary function.
3. Skip Print Screen Entirely
Press:
Windows + Shift + S
If Snipping Tool opens, you can capture the screen without troubleshooting the dedicated Print Screen key.
4. Look for a Different Key Label
Search your keyboard for:
- PrtSc
- PrtScn
- PrntScrn
- Print Screen
- a screenshot or snipping icon
The abbreviation is not standardized across every laptop keyboard.
5. Use Windows’ Alternative Shortcut
On supported hardware without a Print Screen key, Microsoft documents:
Fn + Windows key + Spacebar
6. Check What Happened After Capture
A screenshot can be:
- copied to the clipboard,
- automatically saved,
- opened in an editor,
- or placed in a screenshots/downloads folder.
Knowing which behavior your shortcut uses prevents you from repeatedly taking the same screenshot because you think nothing happened.
Quick Takeaway: When a Windows screenshot shortcut fails, try Windows + Shift + S first. If that works, your screenshot capability is fine and the problem is probably related to the Print Screen key or its keyboard mapping.
Screenshot vs. Screen Recording: Which Should You Use?
A screenshot freezes one moment. A screen recording captures a sequence of actions.
Use a screenshot for an error message, confirmation page, receipt, chart, document section, or single application state.
Use screen recording when you need to demonstrate a process, animation, software bug, or sequence of clicks.
Windows’ Snipping Tool now supports video snips, with Windows + Shift + R available for opening its video-capture overlay on supported Windows systems.
On Mac, Command + Shift + 5 provides screenshot and screen-recording controls.
Chromebook’s Screen Capture interface can also record the full screen, a partial area, or an individual window.
Which Screenshot Method Should You Use?
You do not need to memorize every shortcut.
For a Windows laptop, Windows + Shift + S is the best general-purpose option because you can decide exactly what to capture.
Use Windows + PrtSc when you want a quick full-screen image saved as a file.
Use Alt + PrtSc when you only want the active window.
On a MacBook, remember Command + Shift + 3 for the whole screen and Command + Shift + 4 for a selected area.
On a Chromebook, use the dedicated Screenshot key when available or Shift + Ctrl + Show windows to open Screen Capture.
Once you know your operating system, how to screenshot on laptop becomes straightforward: choose whether you need the full display, one window, or a selected region, use the corresponding shortcut, and then check whether the image was saved as a file or copied to the clipboard.
