
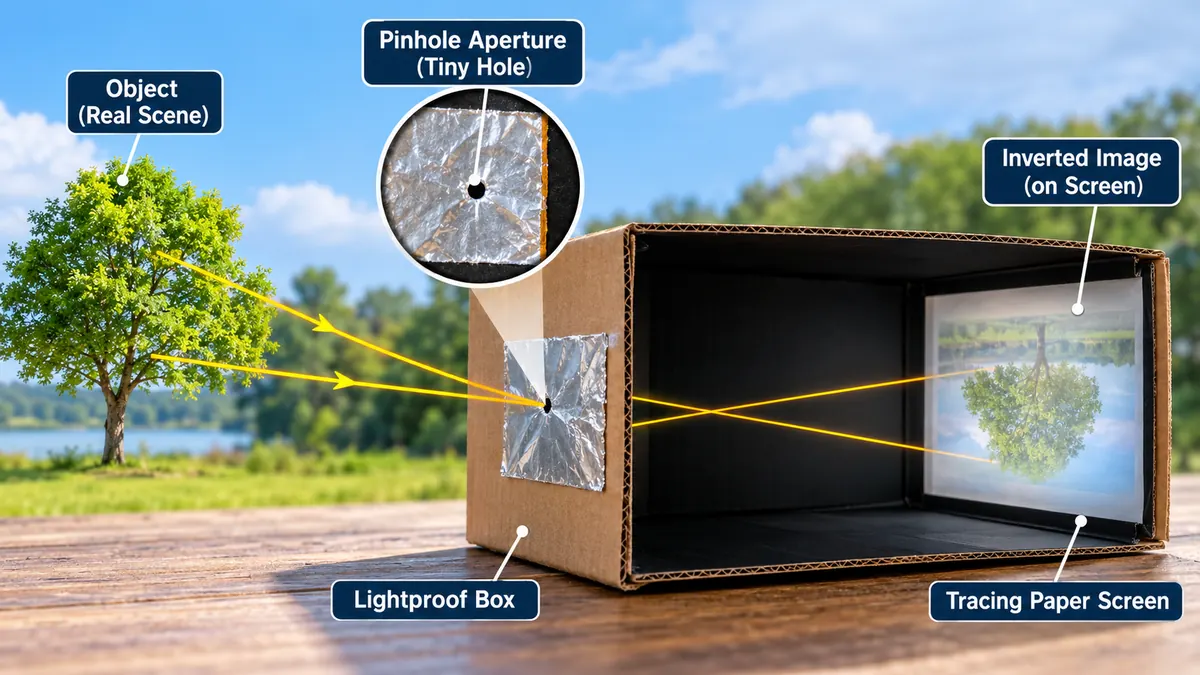

A camera doesn’t need an expensive lens, electronic sensor, or even electricity to form an image. A tiny hole in a dark box can do the job using one of the simplest principles of optics.
A pinhole camera is a basic optical device that forms an image by allowing light to pass through a tiny opening into a dark enclosure. Unlike conventional cameras, it uses no lens. Light traveling in straight lines creates an inverted image on the opposite interior surface, demonstrating the fundamental principles of photography.
Pinhole photography connects ancient scientific discoveries with modern creative photography. It is also one of the easiest ways to explore how light, image formation, exposure, and camera design work.
What Is a pinhole camera?
A pinhole camera is a lightproof box or chamber with a small hole on one side and an image-receiving surface on the opposite side.
Light from objects outside enters through the opening and projects an upside-down image inside the chamber.
A simple pinhole camera has three essential components:
- Lightproof enclosure: Prevents unwanted light from entering.
- Pinhole aperture: Allows a narrow bundle of light rays from each object point to pass through.
- Image plane: Receives the projected image on a screen, photographic paper, or digital sensor.
The device is closely related to the camera obscura, a Latin term meaning “dark chamber.”
Historically, camera obscura systems helped scientists understand light and enabled artists to study perspective and image projection.
Unlike a lens-based camera, a pinhole camera does not use glass optics to focus incoming light.
Instead, its small aperture restricts the paths that light rays can follow, creating a recognizable image.
How Does a pinhole camera Work?
The working principle of a pinhole camera is based on the rectilinear propagation of light, meaning that light travels in straight lines through a uniform medium.
When light reflects from an object, rays travel outward in different directions. Only a small portion passes through the pinhole.
These rays continue toward the opposite interior wall, where they form an image.
Why does a pinhole camera produce an inverted image?
Consider a tree standing in front of a pinhole camera.
Light from the top of the tree travels through the hole and reaches the lower portion of the image screen. Light from the bottom reaches the upper portion.
The rays cross at the aperture, reversing the vertical position of the image.
The same principle reverses left and right across the image plane.
Consequently, the projected image is inverted relative to the original scene.
This happens because of the geometry of straight-line light propagation, not because the camera contains a mirror or lens.
The basic image formation process
- Light from an illuminated object travels toward the camera.
- A small fraction of the incoming rays passes through the pinhole.
- The aperture limits overlapping rays from different directions.
- The rays cross at the opening and continue inside the chamber.
- An inverted image appears on the opposite surface.
The image can be viewed on a translucent screen or captured with light-sensitive photographic material.
Why is the image often dim?
The aperture admits only a small amount of light.
A smaller opening generally improves geometric sharpness up to a point, but it also reduces brightness.
Because relatively little light reaches the image plane, photographic exposures may require several seconds, minutes, or even longer, depending on the lighting conditions, aperture size, and recording medium.
Main Parts of a pinhole camera
Although the design is simple, each component affects the quality of the projected image.
| Component | Function |
|---|---|
| Lightproof box | Blocks unwanted light |
| Pinhole | Controls incoming light rays |
| Aperture plate | Holds the precisely formed opening |
| Image screen | Displays the projected image |
| Photographic paper or sensor | Records a permanent image |
| Shutter | Controls exposure duration |
| Interior black coating | Reduces internal reflections |
Pinhole aperture
The aperture is the most important optical element.
It is usually made in thin metal foil or another opaque material.
A clean, circular opening helps produce more consistent image quality than a rough or irregular hole.
Camera body
The camera body must be sufficiently rigid and lightproof.
Cardboard boxes, metal tins, wooden boxes, and modified camera bodies can all work.
Blackening the interior helps prevent scattered light from reducing image contrast.
Image screen
A translucent screen allows the projected image to be observed.
Photographic paper or film can record the image permanently, while a digital sensor can capture it electronically.
The appropriate surface depends on whether the camera is intended for a science experiment or actual photography.
How to Make a pinhole camera at Home
Making a homemade pinhole camera is a straightforward science project that requires inexpensive materials and a little patience.
You can build a basic model to observe image projection without using photographic film or complicated equipment.
Materials needed
- A cardboard shoebox or similar opaque container
- Aluminum foil
- A sharp needle or fine pin
- Black paper or matte black paint
- Tracing paper or another translucent sheet
- Adhesive tape
- Scissors or a craft knife
- A ruler and pencil
Adult supervision is recommended when cutting cardboard or using sharp needles.
Step 1: Prepare the cardboard box
Choose a sturdy cardboard box with a removable lid.
Inspect it for openings, gaps, or cracks that might allow light to enter.
Cover unwanted openings with opaque tape and line the inside with black paper.
The darker the interior, the better the projected image’s contrast.
Step 2: Create the aperture opening
Cut a small square opening in one end of the box.
The opening should be approximately 2 cm wide.
Cut a slightly larger square of aluminum foil and place it over the opening.
Secure the foil with tape, ensuring that its edges do not leak light.
Step 3: Make a tiny pinhole
Use a fine needle to create a small opening near the center of the foil.
Avoid tearing the foil or creating a large, irregular hole.
A small, round aperture generally produces a clearer image than a large opening.
For an ordinary shoebox camera, a pinhole measuring a fraction of a millimeter is a reasonable starting point.
Step 4: Install the viewing screen
At the opposite end of the box, create a window and cover it with tracing paper.
The paper acts as a translucent projection screen.
For easier viewing, arrange the box so that you can observe the screen from its outer side while keeping direct ambient light off it.
Step 5: Seal unwanted openings
Inspect the enclosure carefully.
Cover any remaining gaps with opaque tape.
Light should enter the image chamber primarily through the pinhole.
Step 6: Test the camera
Point the pinhole toward a brightly illuminated outdoor scene, such as trees or buildings.
Observe the tracing-paper screen from a shaded position.
You should see a faint, inverted image.
If the image is difficult to observe, shield the screen from surrounding light using a dark cloth or viewing hood.
Never look directly at the Sun through the pinhole or use optical devices to view the Sun without appropriate certified protection.
Step 7: Improve the image
Experiment with the aperture size and distance between the pinhole and screen.
Try different lighting conditions and subjects.
A brightly illuminated scene with recognizable shapes is usually easier to observe than a dim indoor environment.
Quick takeaway: A successful homemade camera depends on three factors: a lightproof enclosure, a clean pinhole, and a properly positioned image screen.
The Science Behind Pinhole Photography
A pinhole camera demonstrates several important concepts in physics, including geometric optics, diffraction, aperture, image magnification, and exposure.
Understanding these concepts helps explain why some homemade cameras produce clearer pictures than others.
Rectilinear propagation of light
In a uniform medium, light travels approximately in straight lines.
This principle is central to geometrical optics.
Because the aperture admits only a restricted range of rays from each point in a scene, the camera can form an image without a focusing lens.
The same straight-line behavior explains shadow formation and the geometry of eclipses.
Aperture size and image sharpness
Pinhole diameter strongly affects image quality.
A large opening admits more light, but rays from each object point spread across a larger area on the image plane.
The result is geometric blur.
Reducing the opening decreases this blur until diffraction becomes significant.
Diffraction occurs because light behaves as a wave and spreads after passing through a small opening.
An extremely tiny pinhole can therefore produce a blurry image even though it admits fewer rays.
The best aperture diameter balances geometric blur and diffraction.
Wikipedia
+1
Optimal pinhole diameter formula
One commonly used theoretical approximation for the optimum pinhole diameter is:
\[ d \approx 1.9\sqrt{f\lambda} \]
Where:
- \(d\) = pinhole diameter
- \(f\) = distance from the pinhole to the image plane
- \(\lambda\) = wavelength of light
All measurements must use consistent units.
Different optimization criteria produce slightly different coefficients, so the formula is a practical approximation rather than a universal exact answer.
For example, suppose the image distance is 100 mm and the representative wavelength of visible light is 0.00055 mm.
\[ d \approx 1.9\sqrt{100\times0.00055} \]
\[ d \approx 0.45\text{ mm} \]
This suggests an aperture diameter of approximately 0.45 mm as a starting point for that configuration.
The ideal diameter also depends on the chosen sharpness criterion and the intended photographic application.
Image size and magnification
The size of the projected image depends on the distance between the aperture and image plane, as well as the distance to the subject.
For a simple geometrical model:
\[ \frac{h_i}{h_o}=\frac{v}{u} \]
Where:
- \(h_i\) = magnitude of image height
- \(h_o\) = object height
- \(v\) = pinhole-to-screen distance
- \(u\) = object-to-pinhole distance
This equation uses similar triangles.
Increasing the distance between the pinhole and the screen produces a larger projected image for the same subject distance.
However, spreading the available light over a larger image area reduces brightness.
Depth of field
One remarkable characteristic of pinhole photography is its extremely large depth of field.
Objects at different distances can appear similarly focused because the camera does not rely on a lens with a particular focusing distance.
However, this does not mean every object is perfectly sharp.
Diffraction, aperture size, and geometric blur still limit image resolution.
pinhole camera vs. Digital Camera
Both pinhole and conventional digital cameras form images by collecting light, but their optical systems differ significantly.
| Feature | Pinhole camera | Digital camera |
|---|---|---|
| Main optical element | Small aperture | Lens system |
| Focusing mechanism | No conventional lens focusing | Optical or electronic autofocus, or manual focus |
| Image recording | Screen, film, paper, or sensor | Digital image sensor |
| Exposure time | Often relatively long | Can be extremely short |
| Image sharpness | Limited by aperture and diffraction | Depends on optics, sensor, and settings |
| Depth of field | Extremely large | Varies with aperture and focusing |
| Cost and complexity | Can be very low | Usually more complex |
| Moving subjects | Often difficult to capture sharply | Generally easier |
Why do modern cameras use lenses?
A lens collects light across a much larger opening and redirects it to form an image.
This allows modern cameras to record photographs in lighting conditions where a pinhole camera would require very long exposures.
Lenses also make it possible to adjust focus, control depth of field, and achieve greater detail.
However, lens-based systems can introduce optical distortions and aberrations that must be corrected through optical design or software.
Can a pinhole camera take real photographs?
Yes.
A pinhole camera can capture permanent photographs when it contains a suitable light-sensitive recording medium.
Traditional models use photographic paper or film.
Digital versions use electronic image sensors.
The exposure must be controlled carefully because the small aperture transmits relatively little light.
Types of Pinhole Cameras
Pinhole cameras are available in several forms, each designed for a different educational, artistic, or experimental purpose.
1. Cardboard pinhole camera
This is the simplest design.
It is commonly used in school science experiments to demonstrate light propagation and inverted image formation.
2. Photographic paper camera
A photographic paper camera uses light-sensitive paper inside a lightproof container.
After exposure, the paper must be processed using the appropriate photographic chemicals and safelight conditions.
The resulting image is typically a paper negative.
3. Film-based pinhole camera
Film-based models use photographic film rather than paper.
They can produce negatives that are later printed or digitized.
Some photographers modify existing camera bodies to use pinhole apertures instead of conventional lenses.
4. Digital pinhole camera
A digital pinhole camera replaces the conventional lens with a tiny aperture positioned in front of an electronic sensor.
This design allows photographers to experiment with pinhole effects without chemical development.
5. Room-sized camera obscura
A darkened room with a small opening can function as a large pinhole camera.
Light entering through the opening projects an image of the outdoor scene onto an interior surface.
This makes it possible to demonstrate optical projection on a much larger scale.
History and Invention of the pinhole camera
The pinhole camera did not emerge from a single invention. Its development spans centuries of observations and experiments involving light.
Ancient Chinese observations
The Chinese philosopher Mozi is associated with one of the earliest written explanations of the pinhole-image phenomenon.
Ancient Chinese writings describe how light passing through a small opening produces an inverted image.
This observation helped establish the relationship between straight-line light propagation and image formation.
Aristotle and early Greek optics
The Greek philosopher Aristotle is associated with early discussions of images formed through small openings, particularly observations involving sunlight and eclipses.
These observations contributed to the historical study of optical projection.
Ibn al-Haytham and experimental optics
Ibn al-Haytham, also known as Alhazen, made major contributions to optical science during the 10th and 11th centuries.
His experimental and mathematical analysis of the camera obscura helped explain how light forms images.
His influential Book of Optics contributed to later developments in the scientific understanding of vision, light, and image projection.
Wikipedia
+1
Renaissance developments
During the Renaissance, artists and scientists explored camera obscura devices for drawing and studying perspective.
Leonardo da Vinci described the relationship between the eye and the dark-chamber image projection process.
Later developments introduced lenses and mirrors, making camera obscura systems brighter and more practical for artists.
From camera obscura to modern photography
The camera obscura helped establish the optical foundations of photography.
During the 19th century, advances in light-sensitive chemistry made it possible to record projected images permanently.
Modern digital cameras still rely on the fundamental concept of projecting light from a scene onto an image plane, although they generally use sophisticated lenses and electronic sensors.
Advantages and Limitations of a pinhole camera
Pinhole cameras are useful because they simplify photography to its most basic optical elements.
However, their simplicity also creates practical limitations.
Advantages
- Simple construction: Basic models can be assembled using everyday materials.
- Low cost: Educational versions require few specialized components.
- No focusing lens: The camera operates without complex optical assemblies.
- Large depth of field: Objects at different distances can remain similarly recognizable.
- Educational value: Demonstrates light propagation, image formation, and aperture effects.
- Creative photography: Long exposures can produce unusual motion effects and soft image characteristics.
Limitations
- Low image brightness: The small aperture admits little light.
- Long exposure times: Recording photographs often requires a stable camera and a stationary subject.
- Limited sharpness: Diffraction and geometric blur restrict resolution.
- Difficult framing: Simple homemade models may not include a convenient viewfinder.
- Sensitivity to light leaks: Unwanted openings can reduce contrast or spoil photographic exposures.
- Limited exposure control: Basic models lack the sophisticated controls of modern cameras.
These limitations explain why pinhole cameras remain especially popular in education, experimental photography, and artistic projects rather than everyday high-speed photography.
Common Pinhole Camera Problems and Solutions
Building a camera is relatively easy, but obtaining a clear image often requires experimentation.
| Problem | Likely cause | Practical solution |
|---|---|---|
| No visible image | Insufficient light or blocked aperture | Point toward a brighter scene and inspect the opening |
| Very blurry image | Oversized or irregular pinhole | Make a smaller, cleaner opening |
| Image is extremely dim | Very small aperture or poor viewing conditions | Shield the screen from ambient light |
| Bright streaks or washed-out image | Light leaks | Seal gaps with opaque tape |
| Uneven image brightness | Thick aperture material or off-center opening | Use thin foil and inspect alignment |
| Photographic image is too dark | Excessive exposure | Reduce exposure time |
| Photographic image is too light | Insufficient exposure | Increase exposure time |
For photographic negatives, whether a result appears too light or too dark depends on the recording and processing method.
How can you make a pinhole camera image clearer?
Begin with a clean, circular aperture.
Avoid thick cardboard as the direct pinhole material because the edges can obstruct angled light rays.
Thin aluminum foil or a thin metal plate generally works better.
Keep the camera stable, eliminate light leaks, and test it in bright conditions.
For permanent photography, adjust exposure duration according to the sensitivity of the film or paper.
Why does the camera show an image without a lens?
The pinhole limits the paths available to incoming light rays.
Each point in the scene contributes light to a relatively small region on the image plane.
This spatial restriction produces an image without the refraction normally provided by a lens.
Does a smaller hole always produce a better image?
No.
A smaller aperture initially reduces geometric blur, but making it extremely small increases diffraction.
The best results occur when these competing effects are reasonably balanced.
Uses and Applications of Pinhole Cameras
Although modern photography is dominated by digital cameras, pinhole imaging remains valuable in several fields.
Science education
Teachers use pinhole cameras to demonstrate fundamental optical principles.
Students can directly observe how aperture size affects brightness and image quality.
The experiment also helps explain why images form upside down.
Creative photography
Artists use pinhole cameras to produce distinctive images with soft detail, wide depth of field, and unusual long-exposure effects.
Stationary buildings may remain recognizable while moving people or vehicles appear blurred or disappear from long exposures.
Solar eclipse projection
Pinhole projection can be used to observe a solar eclipse indirectly.
A small opening projects an image of the Sun onto a separate viewing surface.
During a partial eclipse, the projected image can reveal the changing shape of the visible solar disk.
Safety: Never look at the Sun through the pinhole. Observe only the projected image on a screen, with your back to the Sun.
Understanding photographic exposure
Pinhole cameras demonstrate the relationship between aperture, light intensity, and exposure duration.
They provide a useful introduction to photographic concepts such as f-number, shutter time, and image brightness.
Experimental imaging
Researchers, artists, and hobbyists sometimes use lensless imaging arrangements to explore unconventional camera designs.
More advanced computational imaging systems can also use coded apertures, although these systems are considerably more sophisticated than a basic single-pinhole camera.
Interesting Experiments With a pinhole camera
Once you have built a working model, several simple experiments can help deepen your understanding of optics.
Experiment 1: Change the aperture size
Prepare several interchangeable foil pieces with different pinhole diameters.
Observe the same scene through each opening.
Compare image brightness and sharpness.
You will generally find that larger openings create brighter but blurrier images, while extremely small openings can become dim and diffraction-limited.
Experiment 2: Change the camera length
Use an adjustable box to vary the distance between the pinhole and the screen.
Keep the subject in the same position.
As the screen moves farther from the aperture, the projected image becomes larger.
Its brightness per unit area decreases because the available light spreads over a larger area.
Experiment 3: Compare indoor and outdoor scenes
Point the camera toward a bright outdoor landscape, then toward a dim indoor subject.
Compare how easily you can see the projected image.
This experiment demonstrates why available light is especially important in pinhole photography.
Experiment 4: Observe movement
Aim the camera at a scene containing both stationary and moving objects.
If you use photographic paper or film, compare short and long exposures.
Long exposures tend to blur moving objects while preserving more detail in stationary subjects.
Experiment 5: Investigate image inversion
Place a brightly colored object in front of the camera.
Move it upward, downward, left, and right.
Observe how the projected image moves in the opposite direction.
This experiment provides direct evidence of the geometry of image formation.
Final Thoughts on the pinhole camera
A pinhole camera is one of the clearest demonstrations of how light can create an image without a lens. Its operation depends on straight-line light propagation, a carefully sized aperture, and a dark enclosure.
Beyond its historical importance, it provides a practical introduction to image inversion, diffraction, exposure, and photographic design.
Building a simple cardboard model is an effective way to understand these concepts firsthand. Start with a lightproof box and a clean pinhole, then experiment with aperture size, screen distance, and lighting to discover how each variable changes the image.
