
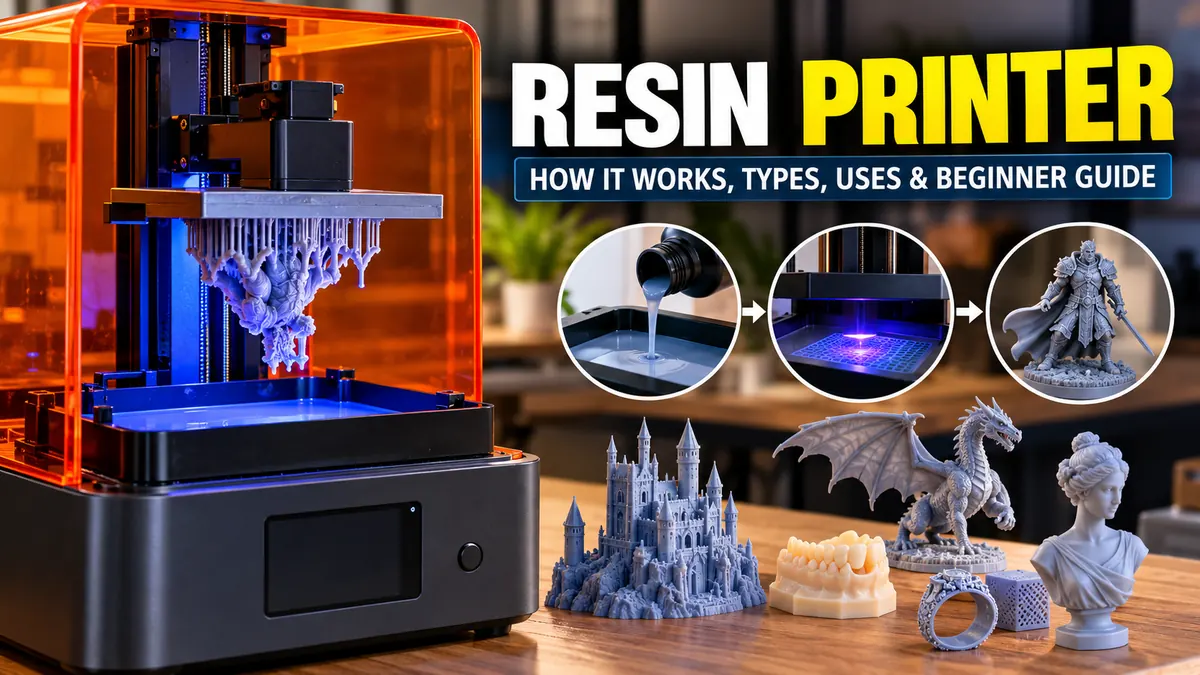

A resin printer can produce tiny textures, sharp edges, smooth curves, and intricate details that are difficult to achieve with many conventional filament-based desktop 3D printers. That precision makes resin printing especially useful for miniatures, jewelry patterns, dental models, prototypes, figurines, and other detail-heavy parts.
But resin printing is not simply a cleaner or more precise version of filament printing. It uses liquid photopolymer, ultraviolet light, a resin vat, and a separate washing and curing workflow. Understanding that process—and the safety precautions that come with it—is essential before getting started.
A resin printer is a type of 3D printer that uses light to selectively cure liquid photopolymer resin into solid layers. Most desktop systems use SLA, DLP, or MSLA/LCD technology. The process delivers fine detail and smooth surfaces, but printed parts normally require washing, support removal, and post-curing before they are finished.
What Is a Resin Printer?
A resin printer is an additive manufacturing machine that creates three-dimensional objects from photosensitive liquid resin.
The broader process is called vat photopolymerization. Instead of melting plastic filament through a hot nozzle, the machine exposes selected areas of liquid photopolymer to light. The exposed material polymerizes and becomes solid.
The printer repeats this process layer after layer until the complete object has been formed.
Resin printing is commonly associated with:
- SLA (stereolithography)
- DLP (digital light processing)
- MSLA (masked stereolithography)
- LCD resin printing
- UV-curable photopolymer resin
These technologies follow the same basic idea but use different methods to control the light that cures each layer.
What Is Photopolymer Resin?
Photopolymer resin is a liquid material formulated to react to specific wavelengths of light.
When sufficient light reaches the resin, a chemical reaction causes it to polymerize and harden. Modern desktop resin printers commonly use UV or near-UV light systems, with 405 nm being widely used in consumer LCD/MSLA machines.
Resins are available with very different properties. Depending on the formulation, a cured part may be rigid, flexible, tough, transparent, heat resistant, castable, or designed for specialized professional applications.
That means the printer itself is only part of the equation. Material selection has a major effect on the finished object’s strength, appearance, accuracy, and intended use.
How Does a Resin Printer Work?
Most desktop resin printers use an inverted vat-photopolymerization design.
A shallow vat contains liquid resin. The bottom of the vat is transparent so that light from underneath can reach the material. A build plate moves vertically along the Z-axis while the printer creates the object one cross-section at a time.
A typical printing cycle works like this:
- Prepare the 3D model. A digital model is imported into slicing software.
- Slice the model. The software divides the object into thin horizontal layers and generates the instructions required by the printer.
- Add supports. Overhangs, islands, and delicate geometry may need support structures.
- Fill the resin vat. Compatible liquid photopolymer resin is poured or automatically dispensed into the tank.
- Position the build plate. The printer creates a very small gap between the build surface or previous layer and the vat film.
- Expose the resin. A laser, projector, or masked light source exposes the required cross-section.
- Cure the layer. Resin exposed to the light hardens.
- Separate the layer. The build platform moves so the cured layer separates from the vat’s release surface.
- Allow resin to refill the gap. Fresh liquid resin flows into position.
- Repeat the cycle. Thousands of layers can be required for a single model.
After printing, the object is removed from the build plate, washed to remove uncured surface resin, and typically post-cured under suitable light.
Why Does the Build Plate Keep Moving?
In many bottom-up desktop resin printers, each newly exposed layer forms against a transparent film at the bottom of the resin vat.
The printer therefore has to separate that layer from the film before creating the next one. This is often called the peel or release stage.
Release forces matter more than many beginners expect. A poorly oriented model can create large cross-sectional areas, increasing separation forces and contributing to failed prints, detached supports, distortion, or other defects.
This is one reason model orientation and support placement are so important in resin printing.
SLA vs DLP vs MSLA Resin Printer Technology
The three terms beginners encounter most frequently are SLA, DLP, and MSLA.
All three cure photopolymer resin, but they control the exposure differently.
| Technology | How Light Is Controlled | Common Characteristic |
|---|---|---|
| SLA | Laser traces the layer | Precise laser-based curing |
| DLP | Projector exposes an image of the layer | Whole-layer projection |
| MSLA/LCD | LCD masks a UV light source | Common in desktop consumer printers |
SLA: Stereolithography
Stereolithography is one of the earliest 3D-printing technologies.
In a traditional SLA system, a laser selectively traces the cross-section of each layer through the resin. Wherever the appropriate light reaches the photopolymer, the material solidifies.
Modern SLA implementations vary considerably from the earliest machines, but laser-based selective curing remains a defining feature of conventional SLA.
DLP: Digital Light Processing
A DLP printer uses projected light rather than tracing the entire cross-section with a single laser point.
Digital micromirror technology controls the projected image used to cure the resin. Because a complete layer can be projected rather than traced point by point, the exposure process differs significantly from traditional laser SLA.
MSLA or LCD Resin Printing
MSLA means masked stereolithography.
In many desktop machines, an array of LEDs provides the light while an LCD screen acts as a mask. The screen allows light to pass only through the areas corresponding to the layer being printed.
The terms LCD printing and MSLA are therefore often used interchangeably when discussing consumer resin printers, although MSLA technically describes the masking process rather than requiring one specific display technology.
Why Are Resin Printers So Detailed?
Detail is one of the main reasons people choose resin over FDM/FFF printing.
An FDM printer creates geometry by extruding lines of molten thermoplastic through a nozzle. Resin systems instead cure precisely defined regions of liquid material using light.
Modern resin systems can combine small optical pixel or spot dimensions with thin layers, allowing them to reproduce fine surface features and small geometry effectively.
However, advertised screen resolution alone does not determine actual print quality.
Several factors affect the final result:
- XY pixel or laser spot size
- layer height
- optical system
- exposure settings
- resin characteristics
- mechanical accuracy
- Z-axis stability
- model orientation
- support placement
- anti-aliasing and slicing settings
- calibration
- post-processing
A printer advertised with a very high-resolution LCD can still produce mediocre results if exposure, mechanics, resin, or model preparation are poorly controlled.
Layer Height
Layer height describes the thickness of each printed layer.
Smaller layers can reduce visible stepping on curved or angled surfaces, but they also increase the number of layers required to complete a model.
For example, a 50 mm-tall object printed at a 0.05 mm layer height requires roughly 1,000 vertical layers.
Using extremely thin layers does not automatically guarantee a better model. The ideal setting depends on the printer, resin, geometry, orientation, and quality requirements.
What Can You Make With a Resin Printer?
Resin printing is particularly effective when surface finish, small features, or dimensional detail matter.
Common applications include:
Miniatures and Figurines
Tabletop miniatures are one of the best-known consumer uses.
Fine facial features, armor patterns, hair, fabric textures, weapons, and decorative surfaces can be reproduced at relatively small scales.
Jewelry Patterns and Models
Jewelry designers can use resin printing to create highly detailed patterns, prototypes, and—in appropriate workflows—castable models.
The ability to reproduce small decorative features makes vat photopolymerization valuable for intricate designs.
Dental Applications
Professional resin systems are widely used in digital dentistry for applications such as dental models and other specialized workflows.
Dental use requires appropriate equipment, validated processes, and application-specific materials rather than ordinary hobby resin.
Engineering Prototypes
Engineers and product designers can use resin printing for:
- visual prototypes
- fit-check models
- small assemblies
- housings
- jigs and fixtures
- master patterns
- concept models
- detailed functional prototypes
Engineering and industrial resins can offer properties very different from standard hobby materials.
Models and Collectibles
Characters, statues, display pieces, scale models, architectural components, and other visually detailed objects are natural candidates for resin printing.
Types of 3D Printing Resin
Choosing the correct resin is just as important as choosing a printer.
Standard Resin
Standard photopolymer is commonly used for general models, miniatures, decorative pieces, and visual prototypes.
It usually emphasizes print quality and affordability rather than demanding mechanical performance.
Tough and Durable Resin
Tougher formulations are designed for applications requiring greater resistance to impact, deformation, or mechanical stress.
The names “tough,” “durable,” and similar terms are not universal engineering classifications, however. Properties vary between manufacturers, so technical data sheets are more useful than marketing names when mechanical performance matters.
Flexible and Elastic Resin
Flexible formulations can produce softer or more compliant components.
They may be useful for grips, flexible prototypes, seals, cushioning features, and other applications where rigid standard resin would be unsuitable.
Castable Resin
Castable formulations are designed for investment-casting workflows, particularly in jewelry and related industries.
They are formulated to burn out appropriately under the manufacturer’s specified casting process.
High-Temperature Resin
Specialized resins can withstand higher temperatures than ordinary photopolymers and may be useful for certain molds, fixtures, prototypes, and engineering applications.
Water-Washable Resin
Water-washable formulations are designed so residual resin can be cleaned using water according to the manufacturer’s instructions rather than relying on the same washing solvent used with many conventional resins.
“Water washable” does not mean uncured resin or contaminated wash water can simply be poured down a household drain. The resin remains a chemical material that requires appropriate handling and disposal.
Resin Printer vs FDM Printer
Resin and FDM printers solve different problems.
| Feature | Resin Printer | FDM/FFF Printer |
|---|---|---|
| Material | Liquid photopolymer | Thermoplastic filament |
| Printing method | Light curing | Melted material extrusion |
| Fine detail | Excellent | Generally lower |
| Surface finish | Typically smoother | Layer lines more apparent |
| Large parts | Often less convenient | Usually practical |
| Post-processing | Washing and curing normally required | Often minimal |
| Handling | Liquid resin requires careful handling | Filament is generally easier to manage |
| Supports | Often required | Depends heavily on geometry |
| Workflow | Wet and chemical | Primarily mechanical/thermal |
FDM works by feeding thermoplastic filament through a heated extruder and depositing the softened material through a nozzle. Resin printing instead relies on photopolymerization.
When Does Resin Make More Sense?
A resin printer is particularly attractive when the project requires:
- very small details
- smooth cosmetic surfaces
- miniature-scale models
- intricate geometry
- detailed master patterns
- dental or jewelry workflows
- compact high-resolution prototypes
When Does FDM Make More Sense?
FDM is often more convenient for:
- large objects
- simple functional components
- brackets
- organizers
- enclosures
- rapid utility parts
- projects where easy handling matters more than microscopic detail
Neither technology is universally superior. The better process depends on the part.
Resin Printer Advantages
Excellent Fine Detail
Small text, textures, facial details, engravings, and decorative geometry can be reproduced effectively with a properly calibrated machine.
Smooth Surface Finish
Thin layers and light-based curing can produce smooth-looking surfaces, especially on correctly oriented curved geometry.
Complex Geometry
Resin printers can handle complicated forms that would be challenging for traditional manufacturing methods, although support structures and print orientation still impose practical constraints.
Multiple Parts Per Layer
On MSLA and DLP systems, much or all of a layer is exposed simultaneously.
As a result, placing additional objects on the build plate may have less effect on exposure time per layer than it would on a process that must trace every feature individually. Actual total print time still depends on the machine, layer count, lift/release settings, and resin.
Resin Printer Disadvantages
The quality comes with trade-offs.
Liquid Resin Requires Careful Handling
Uncured photopolymer should not be treated like ordinary household liquid.
Spills, contaminated tools, gloves, washing liquid, supports, failed prints, and uncured residue all have to be managed properly.
Post-Processing Is Part of the Workflow
A print is generally not finished when the machine stops.
It normally needs to be:
- removed from the build plate,
- drained,
- washed,
- dried,
- separated from supports at an appropriate stage, and
- post-cured according to the resin manufacturer’s recommendations.
Supports Can Leave Marks
Support contact points can leave small marks on the finished surface.
Good orientation moves those contacts away from visually or dimensionally important surfaces whenever possible.
Consumables Go Beyond Resin
Operating costs can include more than bottles of resin.
Depending on the machine, consumable or maintenance items may include:
- vat release films
- resin tanks
- LCD screens
- cleaning materials
- filters
- gloves
- washing solvent
- support material
- build-surface components
This is worth considering when comparing the apparent purchase price of different printers.
Resin Printer Safety
Safety deserves its own section because a resin printer combines chemical handling with a workflow that produces contaminated liquids and surfaces.
Follow the safety data sheet and instructions supplied by the resin and printer manufacturer.
Avoid Direct Contact With Uncured Resin
Wear appropriate chemical-resistant gloves recommended for the material being handled.
Do not deliberately touch uncured resin with bare skin. If accidental exposure occurs, follow the manufacturer’s safety instructions.
Protect Your Eyes
Splashes can occur while pouring resin, removing a build plate, washing parts, or cleaning a vat.
Appropriate eye protection is sensible when splash exposure is possible.
Use Appropriate Ventilation
Resin formulations differ, so ventilation requirements should be based on the manufacturer’s instructions and safety documentation.
Do not assume that a resin is harmless simply because its odor seems weak.
Keep the Work Area Controlled
A good resin workspace separates contaminated items from ordinary household objects.
Useful practices include having dedicated:
- tools
- work surfaces
- cleaning containers
- waste containers
- gloves
- paper towels or wipes
- washing equipment
Keep resin and contaminated materials away from children, pets, food preparation areas, and anything likely to create accidental exposure.
Dispose of Waste Properly
Do not casually pour uncured resin, resin-contaminated solvent, or contaminated wash water into a sink or drain.
Follow the resin manufacturer’s disposal instructions and applicable local waste regulations.
Washing and Post-Curing Resin Prints
Post-processing directly affects the quality of the final object.
Washing
Fresh prints can retain liquid resin on their surfaces and inside recesses.
The appropriate cleaning liquid depends on the resin. Many conventional workflows use isopropyl alcohol or another manufacturer-approved cleaning agent, while specially formulated water-washable products use water-based cleaning processes.
The goal is to remove residual uncured resin without damaging the model.
Drying
Allow the part to dry as required after washing.
Residual cleaning liquid can interfere with the appearance or quality of the curing stage.
UV Post-Curing
Post-curing exposes the cleaned part to suitable light for an additional period.
For materials that require it, this completes or advances polymerization and helps the printed material reach its intended properties. Exact curing conditions vary substantially between resin formulations.
Follow the resin manufacturer’s specified curing time, wavelength, and temperature where provided instead of assuming one setting works for every material.
Supports, Orientation, and Hollowing
Three decisions cause a large percentage of beginner resin-printing problems: orientation, supports, and hollowing.
Model Orientation
Placing every model flat on the build plate is not automatically best.
Angling a part can:
- change cross-sectional area,
- reduce or redistribute release forces,
- move support marks,
- improve access for supports,
- change surface appearance, and
- affect dimensional accuracy.
Orientation should be chosen according to the geometry and which surfaces matter most.
Supports
An “island” is geometry that begins printing without being adequately connected to the previous structure.
Unsupported islands may remain attached to the vat film or become loose cured fragments rather than joining the intended model.
Supports provide temporary connections and mechanical stability while the part is being built.
Too few supports can cause failures. Excessive or badly placed supports can damage surface quality and waste material.
Hollow Models
Large solid resin objects can consume substantial material.
Hollowing can reduce resin use, but hollow parts need careful design. Proper drainage and venting are important so uncured resin is not trapped inside inaccessible cavities.
The internal surfaces must also be considered during cleaning and curing.
For a beginner, a small solid model is often easier to troubleshoot than a complicated hollow object.
Common Resin Printer Problems
Print Stuck to the Vat Instead of the Build Plate
Possible causes include:
- poor build-plate setup
- inadequate bottom exposure
- unsuitable settings
- excessive release forces
- contamination
- resin or temperature-related issues
Check one variable at a time rather than dramatically increasing exposure without diagnosis.
Supports Fail Mid-Print
This can happen when supports are too weak or poorly positioned for the forces created during layer separation.
Model orientation can be just as important as simply adding thicker supports.
Details Look Soft
Overexposure can make tiny features appear swollen or merged.
Other causes can include incorrect resin settings, optical limitations, poor calibration, inappropriate anti-aliasing, or the limits of the original model.
Parts Are Brittle
Some standard photopolymers are inherently less tolerant of impact than engineering thermoplastics.
If mechanical durability matters, select a material designed for the required properties instead of expecting ordinary modeling resin to behave like ABS, nylon, or another engineering plastic.
Layers Separate
Layer separation can be associated with exposure settings, orientation, supports, contamination, material conditions, or excessive mechanical forces during the release cycle.
How to Choose a Resin Printer
Resolution numbers are useful, but they should not be the only purchasing criterion.
1. Look at Actual XY Resolution
A screen advertised as 8K, 12K, 14K, or another resolution tells only part of the story.
Screen resolution must be considered alongside physical screen dimensions and pixel size. Two printers carrying the same “K” label can therefore have different effective XY characteristics.
2. Check Build Volume
Ask what you actually plan to print.
A miniature painter may value fine resolution more than a huge build area. Someone producing larger prototypes may prefer additional volume even if the printer occupies more desk space.
3. Examine the Release System
The resin vat and its transparent release surface are critical parts of the printing process.
Depending on the printer, films may be described as FEP, PFA/nFEP, ACF, or another material. Check availability and replacement cost before purchasing.
4. Consider the Entire Workflow
A resin printer rarely operates alone.
A practical setup may require:
- washing containers or a wash station
- curing equipment
- gloves and other appropriate PPE
- cleaning supplies
- filters
- resin storage
- dedicated tools
- suitable ventilation
- controlled waste handling
Budget and workspace for the complete process, not just the printer.
5. Check Resin Compatibility
Some systems offer broad material compatibility while others are built around more controlled material ecosystems.
If you need engineering, dental, castable, flexible, transparent, or other specialty materials, verify compatibility before choosing the machine.
6. Consider Replacement Parts
Release films, vats, screens, and other components eventually need maintenance or replacement.
A cheap printer becomes frustrating if essential consumables are difficult or expensive to obtain.
7. Evaluate Software
Slicing software is where you orient the model, create supports, hollow parts, add drain holes, select layer settings, and prepare the final print file.
A reliable software workflow can matter as much as headline hardware specifications.
What Do You Need to Start Resin Printing?
The printer alone is not a complete setup.
A basic workspace generally includes:
- resin printer
- compatible photopolymer resin
- slicing software
- appropriate gloves and PPE
- washing equipment
- suitable cleaning agent
- curing light or curing station
- resin filters
- dedicated tools
- protected work surface
- appropriate waste containers
- ventilation suitable for the material and workspace
A silicone mat or other compatible protective work surface can also make spills easier to contain and clean.
A Simple First Resin Print Workflow
Beginners usually learn faster by keeping the first project simple.
Step 1: Choose a Small Model
Select a model that is known to print reliably and does not require complicated hollowing.
Step 2: Check the Printer
Make sure the vat, build plate, release film, and printer are clean and correctly installed according to the manufacturer’s setup instructions.
Step 3: Prepare the Model in a Slicer
Import the model, choose an appropriate orientation, generate supports if required, and use settings appropriate for the specific printer and resin.
Step 4: Fill the Vat
Add enough compatible resin for the job while staying within the manufacturer’s fill limits.
Step 5: Print
Allow the machine to complete the job without disturbing it.
Step 6: Remove the Part Carefully
Let excess resin drain back into the vat where appropriate before moving the build plate to the post-processing area.
Step 7: Wash the Model
Use the cleaning method specified for the resin.
Step 8: Remove Supports
The best point for support removal varies with the material and geometry. Follow the resin and workflow recommendations.
Step 9: Post-Cure
Cure the clean, dry model using the conditions recommended for the material.
Step 10: Inspect the Result
Look at:
- fine details
- support contact points
- dimensional features
- surface quality
- layer consistency
- failed or missing geometry
Use those observations to improve the next print rather than changing several settings at once.
Is a Resin Printer Good for Beginners?
Yes, but it requires more process discipline than many beginners expect.
Modern desktop MSLA machines have made detailed resin printing far more accessible than early stereolithography systems. Compact machines can now provide impressive detail without industrial-scale equipment.
The challenge is usually not understanding how to press “print.” It is learning the complete workflow.
A beginner must become comfortable with:
- model orientation
- support generation
- exposure calibration
- liquid-resin handling
- cleaning
- post-curing
- maintenance
- waste disposal
If your priority is easy production of large utility parts, FDM may provide a simpler starting point.
If your priority is tiny details and smooth surfaces, the extra resin workflow can be worthwhile.
Is Resin Printing Expensive?
The cost depends on far more than the purchase price of the machine.
The real operating cost includes resin plus consumables, failed prints, cleaning materials, vat films, protective equipment, post-processing equipment, and replacement components.
Material usage also depends strongly on what you print.
A small miniature and a large solid engineering model have very different resin requirements. Hollowing can reduce material consumption for suitable models, but it adds design, drainage, washing, and curing considerations.
For that reason, evaluate cost per finished usable part, not simply the price of a bottle of resin.
How Long Does a Resin Printer Take?
Print time depends on:
- model height
- layer height
- number of layers
- exposure time
- lift distance
- lift and retract speed
- settling or wait times
- printer technology
- resin requirements
For MSLA and DLP systems, adding more objects across the same layer may not multiply exposure time in the same way as processes that individually trace or deposit every feature.
Height is often a major factor because a taller object requires more layer cycles.
A 100 mm-tall object at 0.05 mm layers requires around 2,000 layers regardless of whether each layer contains one small part or several appropriately positioned parts.
Does Resin Printing Produce Strong Parts?
It can, but “resin” is not one material.
Standard modeling resin, flexible resin, tough resin, high-temperature resin, and engineering formulations can have dramatically different mechanical properties.
A beautifully detailed print is not automatically a strong one.
When strength matters, look at manufacturer data for properties relevant to your application, such as:
- tensile strength
- elongation at break
- flexural properties
- impact resistance
- heat deflection
- long-term environmental behavior
Also make sure the part receives the specified post-cure, because curing conditions can influence final material performance.
How to Get Better Resin Prints
Better results usually come from controlling the process rather than chasing the highest specification number.
Start with the resin manufacturer’s recommended settings and calibrate from there.
Keep the vat and optical path clean. Inspect the release film for damage. Make sure the build platform and printer mechanics are correctly configured.
Orient parts deliberately rather than automatically.
Place supports according to actual load and geometry.
Avoid unnecessary overexposure just to make prints stick.
Maintain suitable environmental conditions for the resin.
Most importantly, change one meaningful variable at a time when troubleshooting. If you simultaneously change exposure, lift speed, supports, orientation, and layer height, you will not know which adjustment actually solved the problem.
Final Thoughts on Choosing and Using a Resin Printer
A resin printer is one of the most effective desktop manufacturing tools for producing highly detailed objects with smooth surfaces and intricate geometry. SLA uses a laser, DLP uses projected light, and MSLA/LCD systems use a mask to selectively expose photopolymer resin, but all belong to the broader family of vat photopolymerization technologies.
Its greatest advantage—high-detail light-cured printing—is also tied to its biggest practical trade-off. Resin printing requires a complete wet-processing workflow involving liquid material, supports, washing, post-curing, cleaning, and responsible waste handling.
For miniatures, jewelry patterns, detailed prototypes, models, and other precision-focused work, that extra effort can be justified by the quality of the finished parts. For large, simple utility components, filament printing may be more practical.
Before buying a machine, look beyond screen-resolution marketing. Consider build volume, actual XY resolution, resin compatibility, consumables, replacement parts, software, washing and curing requirements, workspace, and safety. A well-chosen resin printer paired with the right material and a disciplined workflow can consistently produce exceptionally detailed 3D prints.
