
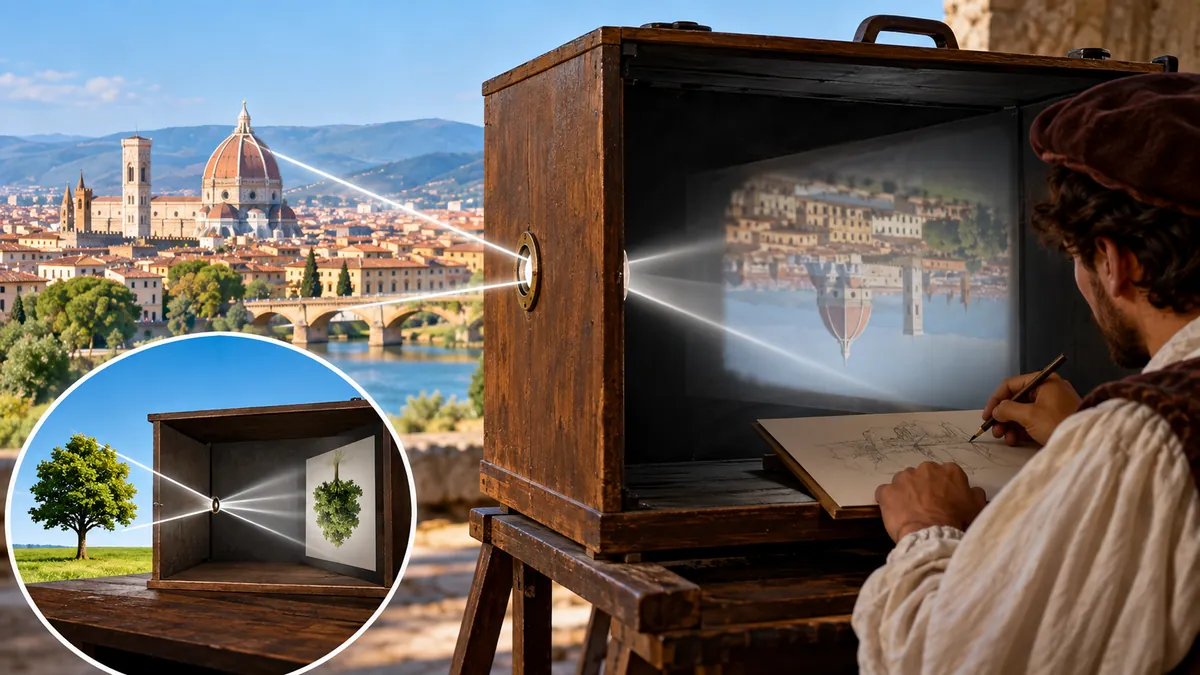

Long before smartphones, film, or even photography existed, people discovered that a tiny opening in a dark space could project the outside world onto a wall. Trees moved, clouds drifted, and people walked through the projected scene—only everything appeared upside down.
That phenomenon became known as the camera obscura, one of the most important ideas in the history of optics, art, and photography.
A camera obscura is a darkened room, box, or enclosure with a small opening that allows light from an outside scene to enter. The light projects an inverted image of that scene onto the opposite interior surface. Later versions added lenses and mirrors to make the projected image brighter, sharper, and easier to view or trace.
Understanding this simple device explains much more than an old artistic technique. It demonstrates the basic optical principle behind photographic cameras and the pinhole-camera model still used to explain image formation today.
What Is a Camera Obscura?
The term camera obscura comes from Latin and means “dark chamber” or “dark room.” Historically, that description was quite literal: some early versions were rooms large enough for a person to enter.
At its simplest, the device needs only three things:
- an enclosed, dark space
- a small aperture or opening
- a surface opposite the opening on which light can fall
Light reflected from objects outside travels through the opening and forms an image inside.
The projected scene preserves recognizable shapes, colors, movement, and perspective, but it appears inverted. More sophisticated camera obscuras use a convex lens instead of a simple pinhole, allowing more light into the enclosure while maintaining a useful image.
Unlike a photographic camera, a traditional camera obscura does not automatically record anything. It simply produces a temporary optical projection. An observer can watch that image or trace it manually.
That distinction eventually became crucial to the invention of photography.
How Does a Camera Obscura Work?
The basic camera obscura works because light travels approximately in straight lines through ordinary air.
Imagine a tree standing outside a dark box.
Light reflected from the top of the tree travels in many directions. A small portion passes through the aperture and continues toward the lower part of the opposite wall. Light from the bottom of the tree follows a different path through the same opening and reaches a higher point.
Because these rays cross at the aperture, the projected tree appears upside down.
The same process occurs for every visible point in the scene, producing a complete image.
Why Is the Image Upside Down?
The aperture does not turn or rotate the image. Instead, the inversion is a consequence of straight-line light propagation.
Consider two points:
- Light from a high point in the outside scene passes through the opening and reaches a low point on the projection surface.
- Light from a low point passes through the opening and reaches a high point.
Rays coming from opposite horizontal directions cross in the same manner.
The result is an inverted projection.
This basic geometry eventually became fundamental to understanding photographic cameras and perspective projection. In computer vision, the related pinhole camera model remains a standard way to describe how points in three-dimensional space are projected onto a two-dimensional image plane.
Why Does the Opening Need to Be Small?
If the opening is very large, many light rays from each point in the scene enter simultaneously and overlap with rays from neighboring points. The projected image becomes bright but blurry.
Reducing the aperture restricts the range of rays reaching each location on the projection surface, making the image clearer.
But smaller is not endlessly better.
An extremely small aperture lets in very little light, producing a dim image. At sufficiently tiny apertures, diffraction also reduces sharpness because light spreads as it passes the opening.
This creates a fundamental optical trade-off:
| Aperture | Brightness | Image Quality |
|---|---|---|
| Too large | Bright | Blurry from overlapping rays |
| Appropriately small | Moderate | Relatively clear |
| Extremely small | Very dim | Softened by diffraction |
This relationship between aperture, brightness, and image quality foreshadows principles that remain central to photography.
Camera Obscura With a Lens
A simple pinhole works, but it has a major limitation: very little light can pass through it.
A lens offers a solution.
Instead of admitting only a narrow bundle of rays, a lens can collect light through a larger opening and refract those rays toward appropriate points on the projection surface. This produces a considerably brighter image while retaining useful sharpness.
High-quality lenses became increasingly important in camera obscura designs during the early modern period. The History of Science Museum at Oxford notes that improvements in lens manufacture in the early 1600s enabled larger apertures and brighter, higher-quality projections.
Some designs also incorporated mirrors.
A mirror could redirect the projected image onto a horizontal surface, making it easier for an artist to view and trace. Historical camera obscuras therefore ranged from simple darkened rooms to sophisticated portable optical instruments.
The History of the Camera Obscura
The camera obscura cannot easily be credited to a single inventor. Its underlying phenomenon was observed and investigated across different cultures and centuries.
Its history is better understood as a gradual progression from observations about light to practical optical instruments.
Ancient Observations of Projected Images
Knowledge of the underlying phenomenon goes back to antiquity.
The Greek philosopher Aristotle, writing in the fourth century BCE, discussed observations related to light passing through small openings. Ancient Chinese writings associated with Mozi also contain early observations of inverted images and straight-line light propagation.
These accounts show that people recognized aspects of pinhole projection long before anything resembling a photographic camera existed.
Ibn al-Haytham and the Science of Optics
A major development came through the work of Ibn al-Haytham, also known in Latin sources as Alhazen.
Working around the turn of the 11th century, Ibn al-Haytham made influential contributions to the study of vision and optics. His investigations included the behavior of light passing through small openings and observations connected with solar eclipses.
His work helped establish a more systematic understanding of how light and image formation operate. Historical accounts consequently place him among the central figures in the development of camera obscura principles.
The importance of this development goes beyond the device itself. It belongs to the broader transition toward explaining vision through light entering the eye rather than treating sight as something emitted outward by the observer.
Leonardo da Vinci and the Dark Room
During the Renaissance, Leonardo da Vinci described the camera obscura phenomenon in his manuscripts.
He compared the behavior of light in a darkened room with aspects of human vision and recognized that an outside scene could be reproduced through a small opening.
Leonardo’s writings helped connect optical observation with Renaissance interests in realistic representation, geometry, perspective, and the study of vision.
His manuscripts were not immediately responsible for widespread adoption, however. Other writers later brought descriptions of the device to larger audiences.
Giovanni Battista della Porta and Wider Popularity
In the 16th century, Italian scholar Giovanni Battista della Porta described the camera obscura in his influential work Natural Magic.
Descriptions such as these helped spread knowledge of the device beyond specialist investigations.
Optical improvements were appearing during roughly the same period. Lenses could replace or supplement simple apertures, providing brighter projections and making the camera obscura increasingly useful as a practical visual instrument.
Johannes Kepler and the Name “Camera Obscura”
The term itself became established in the early 17th century.
The earliest known use of camera obscura in this context is associated with German astronomer and mathematician Johannes Kepler, who used the term in his 1604 Ad Vitellionem Paralipomena. Kepler also worked with portable forms of the device for observing and recording landscapes.
This was an important transition.
The camera obscura was no longer merely a curious effect observed inside a dark room. It was becoming a deliberately constructed optical instrument.
How Artists Used the Camera Obscura
For artists, one of the device’s greatest advantages was its ability to produce convincing perspective automatically.
A landscape or building projected onto a flat surface already contained spatial relationships generated by optical projection. An artist could trace major outlines and then develop the drawing or painting manually.
The National Gallery in London describes the camera obscura as an artistic aid used from the 17th century onward for plotting compositions.
It could help with:
- architectural proportions
- linear perspective
- relative object sizes
- landscape composition
- positioning complicated groups of shapes
- recording scenes while traveling
This did not mean that the machine created a finished painting. The projected image disappeared as soon as the lighting or scene changed. Artists still needed to trace, interpret, compose, and apply their own materials and techniques.
Did Vermeer Use a Camera Obscura?
Johannes Vermeer is frequently connected with the camera obscura because certain characteristics of his paintings have been compared with optical effects.
However, the claim should not be presented as established fact.
The National Gallery states that Vermeer and Carel Fabritius may have experimented with the device, while the use of camera obscura by Venetian painter Canaletto is more firmly documented.
Debate over Vermeer continues among historians. The visual qualities of his paintings provide interesting evidence for possible optical influence, but they do not by themselves prove exactly how he worked.
That distinction matters because discussions of historical technology sometimes turn plausible theories into certainty.
Camera Obscura vs. Pinhole Camera
The terms camera obscura and pinhole camera are related but are not always interchangeable.
Both depend on the same fundamental principle: light from an external scene enters a dark enclosure and creates an inverted image.
The difference usually concerns construction and purpose.
| Feature | Camera Obscura | Pinhole Camera |
|---|---|---|
| Enclosure | Room, tent, box, or portable device | Usually a small light-tight box |
| Opening | Pinhole or lens | Pinhole |
| Main purpose | Viewing, projection, tracing | Often recording photographs |
| Lens required? | No; some versions use one | No |
| Image recording | Not inherently | Usually uses film or photographic paper |
| Image | Live optical projection | Projection that can be recorded |
A pinhole camera can therefore be considered a specialized form of the broader camera-obscura principle.
The crucial difference is not simply size. A room-sized device can use a pinhole, while a compact camera obscura can use a lens.
From Camera Obscura to Photography
The camera obscura could produce remarkably convincing images, but for centuries those images had one major limitation:
They could not preserve themselves.
If an artist wanted a permanent copy, the projected scene had to be traced.
The breakthrough that produced photography occurred when inventors combined optical projection with light-sensitive materials.
The optical problem had effectively been solved already. A camera obscura could form the image. What remained was finding a reliable chemical method for capturing that image permanently.
Experiments showed that substances including silver compounds react to light. By the early 19th century, researchers began bringing these chemical discoveries together with the camera obscura.
Nicéphore Niépce, Louis Daguerre, and William Henry Fox Talbot became central figures in the emergence of practical photography. MoMA’s history of early photography describes the invention as the combination of two previously known principles: camera-obscura image formation and the light sensitivity of certain chemicals.
Talbot’s work provides a particularly direct historical connection. The Metropolitan Museum of Art holds photographs titled Camera Obscura made by Talbot around 1839–40 using salted paper prints from paper negatives.
The camera had finally become more than a projector.
It could record.
Camera Obscura and the Modern Camera
Modern cameras are vastly more sophisticated, but the underlying geometry remains recognizable.
A photographic camera contains a light-controlled enclosure. Light enters through an aperture and lens system and forms an image on a recording surface.
In a film camera, that surface is photosensitive film.
In a digital camera, it is an electronic image sensor.
A simplified comparison looks like this:
| Camera Obscura | Modern Camera |
|---|---|
| Dark room or box | Light-tight camera body |
| Pinhole or simple lens | Precision multi-element lens |
| Small opening | Adjustable aperture |
| Wall or screen | Film or digital sensor |
| Projected image | Recordable image |
| Manual observation | Electronic or chemical capture |
Modern lenses correct optical problems such as chromatic and spherical aberration, while shutters precisely control exposure time and digital sensors convert incoming light into electronic information.
Yet the basic objective is unchanged: control incoming light so that a scene forms an organized two-dimensional image.
That is why the camera obscura is often described as an ancestor of the photographic camera.
What Was the Camera Obscura Used For?
Although its relationship with photography is its best-known legacy, the camera obscura served several purposes over its long history.
Studying Light and Optics
The device provided a practical way to investigate how light behaves.
Researchers could observe how rays passing through an aperture produced an image and explore relationships among aperture size, projection distance, brightness, and sharpness.
These experiments contributed to the development of geometrical optics.
Observing the Sun
Small-aperture projection also provided a way to observe solar phenomena indirectly rather than staring directly at the Sun.
Historical accounts connect camera-obscura principles with observations of eclipses and other astronomical phenomena.
A projected solar image can be studied on a surface while the observer looks away from the Sun itself.
Drawing and Painting
Portable camera obscuras became useful aids for artists, especially when accurate perspective and architectural proportions were desirable.
Artists could project a scene onto paper and trace important contours before completing the work by hand.
Landscape and Topographical Work
Portable designs made the principle useful for travelers and people recording landscapes.
Kepler, for example, is associated with a tent-style portable camera obscura used for topographical work.
Entertainment
Large camera obscuras also became attractions.
A room-sized installation could transform the surrounding landscape into a moving projection. People inside could watch pedestrians, waves, clouds, vehicles, and other activity unfold on a viewing surface in real time.
Unlike cinema, there is no recorded film being played. The image is created live by light arriving from outside.
How to Make a Simple Camera Obscura
You can demonstrate the principle without sophisticated optical equipment.
A basic version can be constructed from cardboard, tracing paper, aluminum foil, tape, and a pin. Educational instructions published by the University of Cambridge Museums use these everyday materials to demonstrate the effect.
What You Need
- cardboard box or tube
- aluminum foil
- pin or tack
- tracing or baking paper
- scissors
- opaque tape
Adult supervision is appropriate when scissors, blades, pins, or other sharp tools are involved.
Step 1: Create the Projection Screen
Place tracing paper across one end or interior section of the cardboard enclosure.
Keep the paper reasonably flat because this is where the projected image will appear.
Step 2: Make the Aperture
Cover the opposite opening with aluminum foil.
Carefully make a small, clean hole near the center using a pin.
The quality of this hole affects the resulting image.
Step 3: Block Unwanted Light
Seal gaps and seams with opaque tape.
Stray light reduces contrast and makes the projected scene harder to see. A good camera obscura should be dark except for light entering through its intended aperture.
Step 4: Point It Toward a Bright Scene
Aim the aperture toward a well-lit outdoor subject.
Give your eyes time to adjust if necessary. The image on the screen should appear upside down.
Step 5: Experiment
Try changing the distance between the aperture and projection surface or compare different aperture sizes.
You will quickly see the trade-off between brightness and sharpness.
A larger opening generally creates a brighter but less defined projection. A smaller opening improves definition up to a point but reduces brightness.
That experiment demonstrates the same optical compromises that influenced the development of lenses and photographic cameras.
Can a Camera Obscura Take a Photograph?
Not by itself.
A traditional camera obscura only projects an image.
To make a photograph, the projected light must be captured on a photosensitive material or electronic sensor.
This distinction is one of the easiest ways to understand the historical development of photography:
Camera obscura = forming the image.
Photography = forming and permanently recording the image.
Once inventors found practical methods for making light-generated images permanent, the camera obscura effectively became the optical foundation of the photographic camera.
Does a Camera Obscura Need a Lens?
No.
The simplest version uses only a small hole.
A lens became useful because a pinhole necessarily limits the amount of light entering the enclosure. Opening the hole increases brightness but sacrifices image clarity because rays overlap.
A properly focused lens can collect substantially more light and direct it toward the image plane, producing a brighter projection.
This made lens-equipped camera obscuras more practical for artists and observers. Historical designs later incorporated additional refinements such as mirrors, portable boxes, folding structures, and dedicated viewing surfaces.
Why the Camera Obscura Still Matters
The camera obscura remains useful because it makes image formation visible.
With a modern smartphone, countless processes happen invisibly. Lenses focus light, an image sensor detects photons, electronics convert signals into digital data, and software processes the final picture almost instantly.
A camera obscura strips that complexity away.
There is simply a scene, light, an aperture, darkness, and an image.
That simplicity makes it valuable for teaching:
- optics
- perspective
- photography
- visual perception
- art history
- astronomy
- basic camera geometry
It also provides a direct connection between ancient observations of light and today’s photographic technologies.
The Metropolitan Museum of Art even preserves a 19th-century camera obscura made from wood, glass, and optical components as part of its photographic equipment collection, illustrating how these devices eventually became refined physical instruments rather than merely darkened rooms.
The Lasting Legacy of the Camera Obscura
The camera obscura demonstrates that one of photography’s most fundamental ideas existed centuries before anyone could actually take a photograph.
Ancient observers noticed unusual images created by tiny openings. Scholars including Ibn al-Haytham investigated the behavior of light. Renaissance thinkers such as Leonardo da Vinci described the phenomenon, while later figures including Giovanni Battista della Porta and Johannes Kepler helped develop and popularize practical applications. Artists adopted optical devices as drawing aids, and improvements in lenses made projected images brighter and easier to use.
The decisive transformation came when 19th-century experimenters found ways to preserve those projected images using light-sensitive materials.
From that point, the dark chamber evolved into the photographic camera.
Modern digital cameras may contain sophisticated lenses, sensors, processors, autofocus systems, and computational imaging software, but their basic task still echoes the camera obscura: control light entering a dark enclosure and use it to form an image.
For anyone trying to understand how cameras began—or simply how light can turn the outside world into a picture—the camera obscura remains one of the clearest demonstrations imaginable.
